

If you love the crunchy, peanut buttery magic of Butterfingers and the smooth richness of chocolate, these Butterfinger Balls are your new obsession! This no-bake dessert is perfect for parties, holiday gifts, or satisfying your sweet tooth in minutes. Plus, they’re irresistibly easy to make—no oven required!
Why You’ll Love This Recipe
✅ No baking needed – Ready in under an hour!
✅ Crunchy & creamy – A perfect mix of crispy Butterfinger and velvety chocolate.
✅ Great for gifting – Package in cute boxes or tins for edible holiday presents.
✅ Kid-friendly – Fun to make and even more fun to eat.
Ingredients & Substitutions
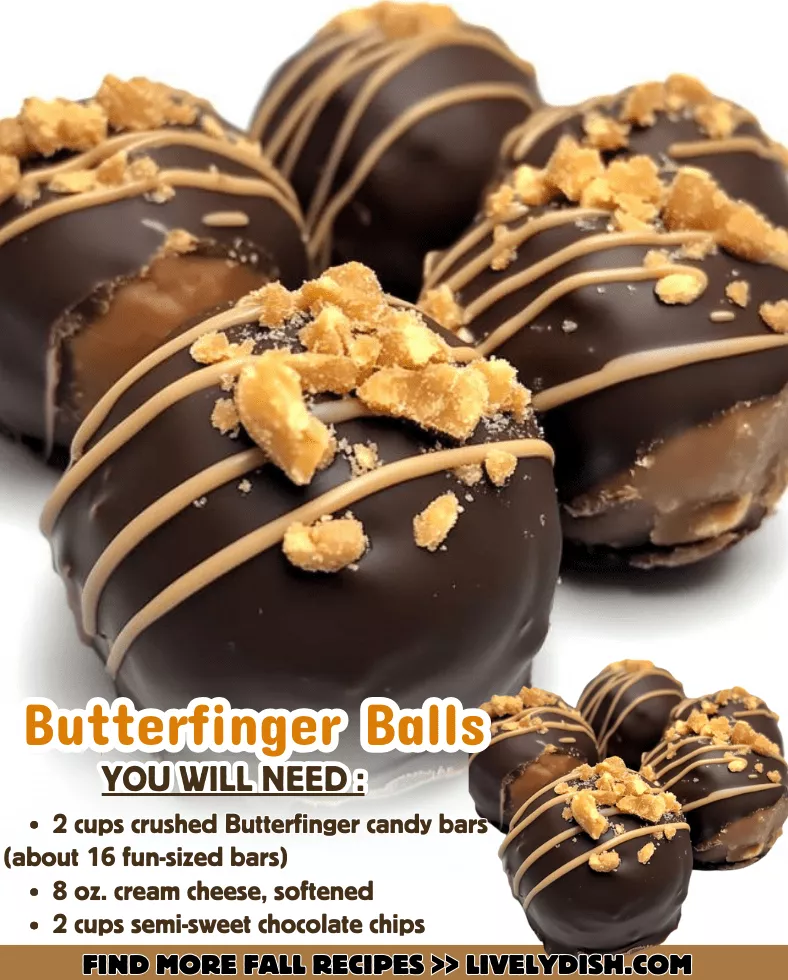
For the Balls:
- 2 cups crushed Butterfinger bars (~16 fun-size bars) – The star of the show! (Pro tip: Freeze them for easier crushing.)
- 8 oz. cream cheese, softened – Adds richness and helps bind the mixture.
- 1 cup powdered sugar – Sweetens and balances the peanut butter.
- 1 cup graham cracker crumbs – Gives structure and a subtle honey flavor.
- ½ cup creamy peanut butter – Enhances the nutty taste.
- ¼ cup melted butter – Helps hold everything together.
For the Chocolate Coating:
- 2 cups semi-sweet chocolate chips – Melts into a smooth, decadent shell.
- 1 tbsp vegetable shortening (optional) – Makes dipping smoother (butter or coconut oil work too).
Optional Toppings:
- Butterfinger crumbs
- Chocolate sprinkles
- Crushed peanuts
- Sea salt flakes
Step-by-Step Instructions
1. Prep the Butterfingers
- Crush the candy bars into fine crumbs (use a food processor or rolling pin).
2. Mix the Base
- In a large bowl, beat the cream cheese until smooth.
- Add powdered sugar, graham cracker crumbs, Butterfinger crumbs, peanut butter, and melted butter. Mix until fully combined.
3. Shape & Chill
- Roll the mixture into 1-inch balls (use a cookie scoop for even sizing).
- Place on a parchment-lined tray and chill for 30 minutes (this makes dipping easier!).
4. Melt the Chocolate
- In a microwave-safe bowl, melt chocolate chips + shortening in 30-second bursts, stirring between each, until smooth.
5. Dip & Decorate
- Use a fork or toothpick to dip each ball into the melted chocolate, letting excess drip off.
- Place back on parchment and sprinkle with toppings before the chocolate sets.
6. Set & Serve
- Let the chocolate harden at room temp (or speed it up in the fridge for 10 minutes).
- Store in an airtight container for up to 1 week (if they last that long!).
Tips for Perfect Butterfinger Balls
🔹 For smoother dipping, warm the chocolate in short intervals to avoid seizing.
🔹 Too sticky? Dust your hands with powdered sugar when rolling.
🔹 Want extra crunch? Mix in chopped peanuts with the Butterfinger crumbs.
🔹 Make ahead! Freeze undipped balls for up to 1 month—dip when ready to serve.
Serving Ideas & Variations
Ways to Enjoy:
- As holiday gifts – Pack in mini cupcake liners inside a festive box.
- With ice cream – Crumble over vanilla or chocolate for a Butterfinger sundae.
- For parties – Serve on a dessert platter with other candies.
Flavor Twists:
- White chocolate coating + crushed Oreos for “Cookies & Cream” style.
- Dark chocolate shell + sea salt for a gourmet touch.
- Nut-free version – Use sunflower seed butter instead of peanut butter.
FAQ (Common Questions)
Can I use store-bought Butterfinger crumbs?
Yes! Look for “Butterfinger baking bits” in the baking aisle.
Why is my mixture too soft?
- Chill longer before dipping.
- Add 1-2 tbsp extra graham cracker crumbs to thicken.
Can I use milk chocolate instead?
Absolutely! Milk or dark chocolate work great.
Final Thoughts
These Butterfinger Balls are the ultimate easy, no-bake treat—packed with nostalgia and irresistible flavor. Whether you’re making them for a party, a holiday cookie swap, or just because, they’re guaranteed to be a hit!
Craving more no-bake desserts? Try our Peppermint Bark or Oreo Truffles next!
Tag us on social media with #ButterfingerBalls if you make them! 😍🍫
Need adjustments? Let me know! Happy snacking! ✨