Easy Homemade Peanut Butter Cups recipe 01
⭐⭐⭐⭐⭐ 4.9 from 10478 votes
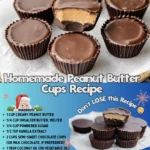
Easy Homemade Peanut Butter Cups recipe
✔ No Unnecessary Additives – Store-bought versions often contain preservatives, excess sugar, and hydrogenated oils. Making them at home means cleaner ingredients.
✔ Customizable Sweetness & Texture – Prefer dark chocolate? Want a crunchier filling? You control the ingredients.
✔ Budget-Friendly – A batch of homemade peanut butter cups costs less than buying premium brands.
✔ Perfect for Gifting – Package them in a cute box or bag for a heartfelt homemade gift.
Ingredients
For the Peanut Butter Filling
- 1 cup creamy peanut butter – Use natural for a healthier option or regular for extra creaminess.
- ¼ cup unsalted butter, melted – Helps bind the filling for a smooth texture.
- ¼ cup powdered sugar – Adjust to taste; omit if you prefer less sweetness.
- ½ tsp vanilla extract – Enhances flavor depth.
For the Chocolate Coating
- 2 cups semi-sweet chocolate chips – Can substitute with milk or dark chocolate.
- 1 tbsp coconut oil – Makes the chocolate smoother and easier to melt (substitute with vegetable oil if needed).
Optional Add-Ins & Toppings
- Sea salt flakes – For a sweet & salty contrast.
- Crushed peanuts – Adds crunch.
- Mini chocolate chips – For extra texture.
- A dash of cinnamon – For a warm, spiced twist.
Instructions
Step 1: Prepare the Peanut Butter Filling
- In a medium bowl, combine peanut butter, melted butter, powdered sugar, and vanilla extract.
- Stir until smooth and fully incorporated.
- Refrigerate for 10 minutes to firm up slightly—this makes it easier to shape.
Pro Tip: If the mixture is too sticky, add a bit more powdered sugar.
Step 2: Melt the Chocolate
- In a microwave-safe bowl, mix chocolate chips and coconut oil.
- Microwave in 30-second intervals, stirring after each, until fully melted and glossy (about 1-2 minutes total).
Alternative Method: Use a double boiler for more controlled melting.
Step 3: Assemble the Peanut Butter Cups
- Line a muffin tin with cupcake liners (mini or regular size).
- Spoon 1-2 teaspoons of melted chocolate into each liner, spreading to coat the bottom evenly.
- Freeze for 5 minutes to set the base.
Step 4: Add the Peanut Butter Layer
- Remove from the freezer and place a small scoop of peanut butter filling in each cup.
- Gently press down, leaving a small border for the top chocolate layer.
Pro Tip: Wet your fingers slightly to prevent sticking when shaping the filling.
Step 5: Seal with More Chocolate
- Pour another layer of melted chocolate over the peanut butter, covering it completely.
- Lightly tap the tin to remove air bubbles and smooth the tops.
Step 6: Chill & Set
- Freeze for 10-15 minutes (or refrigerate for 30 minutes) until fully firm.
- Once set, peel off the liners and enjoy!
Storage Tip: Keep in an airtight container in the fridge for up to 2 weeks or freeze for longer shelf life.
Notes
 Use High-Quality Chocolate – Cheap chocolate can become waxy when melted. Opt for Ghirardelli, Guittard, or Lindt for best results. Adjust Sweetness – If using natural peanut butter, you may need a bit more powdered sugar. Add Texture – Mix in crushed pretzels, Rice Krispies, or chopped nuts for extra crunch. Decorate Creatively – Drizzle with white chocolate, sprinkle with flaky salt, or dust with cocoa powder.
Keywords: Homemade Peanut Butter Cups
Find it online: https://livelydish.com/homemade-peanut-butter-cups/